Set up your Atli eSIM
Do it at home on wifi before your travel.
Which phone are you using?
1Before you start
Three things to check first.
Your phone takes an eSIM
iPhone XR, iPhone XS and every iPhone since.
Most Samsung Galaxy S20 and later, Google Pixel 3 and later, and many recent models from other makers.
To check, open your phone dialler and type *#06#. If a line called EID appears, your phone takes an eSIM. If there is no EID, it does not.
Check your exact model
Your phone is not locked to one network
A phone bought on a contract can be locked to the operator that sold it. A locked phone will not accept another eSIM. Your operator can tell you if yours is locked, and can usually unlock it.
You are on wifi
Installing an eSIM needs an internet connection, and you will not have one when you arrive. Install at home, on wifi.
2Put the eSIM on your phone
Your eSIM arrives in the chat straight after you pay. Bought on the web app instead? Your eSIM and plans are in your profile on heyatli.com. Try these in this order.
EasiestOne tap
On iOS 17.4 and later, tap Install on iPhone, in the chat or in your profile on heyatli.com. Your phone opens its own setup screen. Follow it, then come back here for step 3.
Tap Install on Android, in the chat or in your profile on heyatli.com. Your phone opens its own setup screen. Follow it, then come back here for step 3.
Scan the QR code
The code has to be on a second screen, or saved to your photos. A phone cannot scan a code on its own screen.
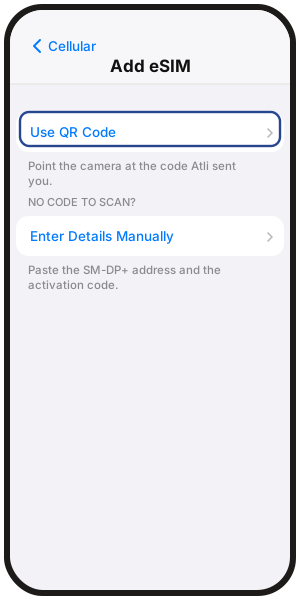
Settings › Cellular › Add eSIM › Use QR Code. Point the camera at the code. If you saved it to Photos, tap Open Photos on that same screen instead.
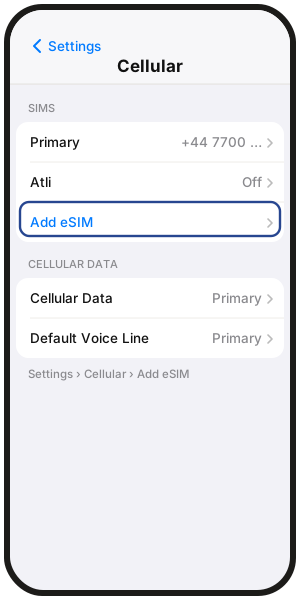
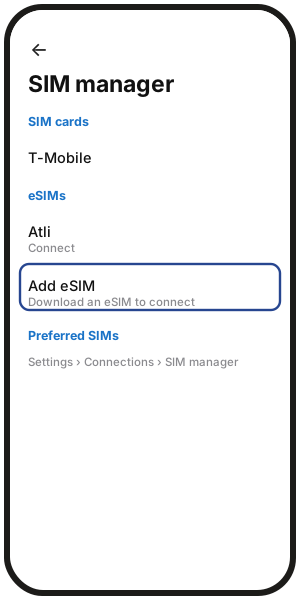
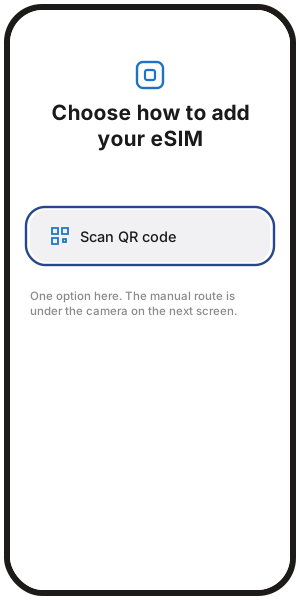
Settings › Connections › SIM manager › Add eSIM. A screen called Choose how to add your eSIM appears, with one button: Scan QR code.
Enter it manually
Ask Atli for wallet in the chat and tap QR / Install. On the web it is in your profile. Copy it exactly.
iPhone asks for two things, an SM-DP+ Address and an Activation Code, in separate boxes.
Settings › Cellular › Add eSIM › Use QR Code › Enter Details Manually.
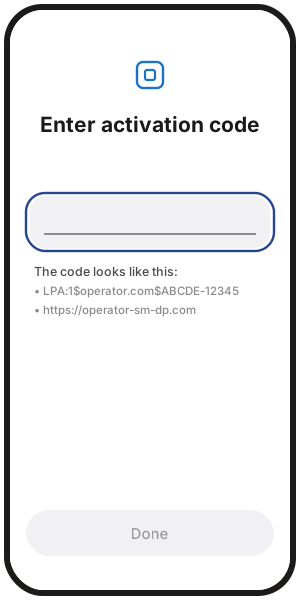
Android asks for one line, on a screen called Enter activation code. Paste the whole code. It starts with LPA:1$, or it is the SM-DP+ web address on its own.
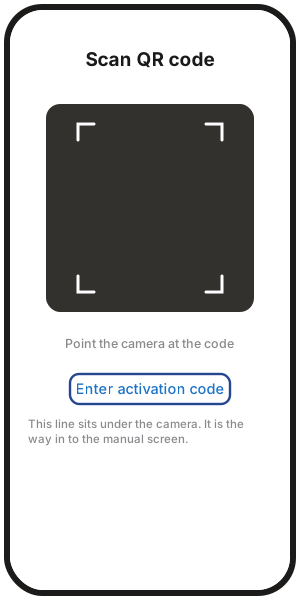
Tap Scan QR code to open the camera, then tap Enter activation code on the line underneath it.
Rename it to “Atli”
Rename it to Atli. The screens below use that name.
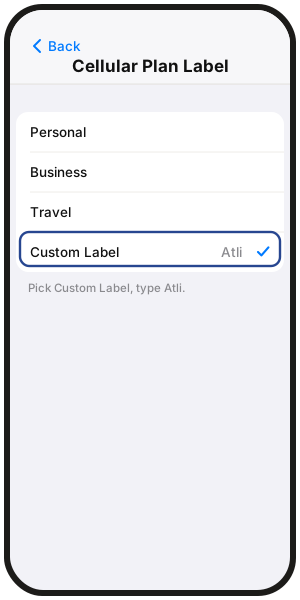
iPhone asks during setup, on a screen called Cellular Plan Label. Pick Custom Label, type Atli.
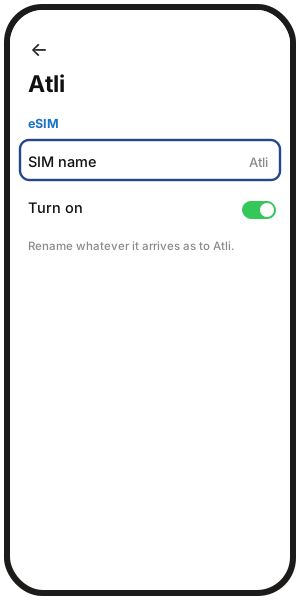
Android gives it a default name. Settings › Connections › SIM manager › tap the eSIM › SIM name.
You can install the same eSIM again later. The code stays in your chat history, and in your profile on the web.
3Set it up on your phone
Menu names move around between makers. Match the words rather than the exact path. The route below is Samsung's.
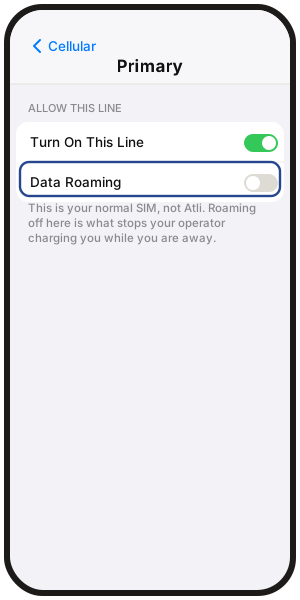
1. Turn data roaming off on your regular SIM
Stops your normal operator charging you while you are away.
Settings › Cellular › SIMs › tap your regular SIM, the one with your phone number under it › Data Roaming off.
2. Switch the Atli eSIM on
Settings › Cellular › SIMs › Atli › turn it on.
On the same screen, set Data Mode to Low Data Mode. Stops iOS spending your data on background jobs like system updates.
3. Choose Atli for cellular data
Settings › Cellular › Cellular Data › pick Atli.
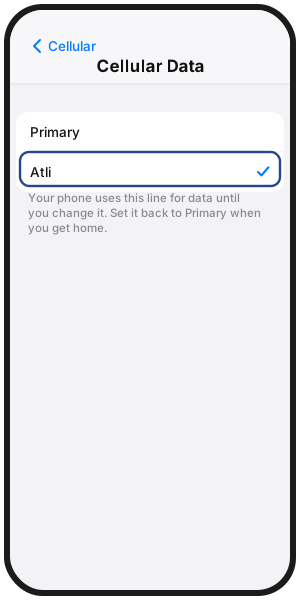
Your phone uses Atli for data for as long as Atli is selected here. Set it back to your normal SIM when you get home.
4. Turn off iCloud backup over cellular
A backup can use a lot of data.
Settings › your name › iCloud › iCloud Backup › Back Up Over Cellular off.
1. Pick Atli for mobile data
Settings › Connections › SIM manager › set mobile data to the Atli eSIM.
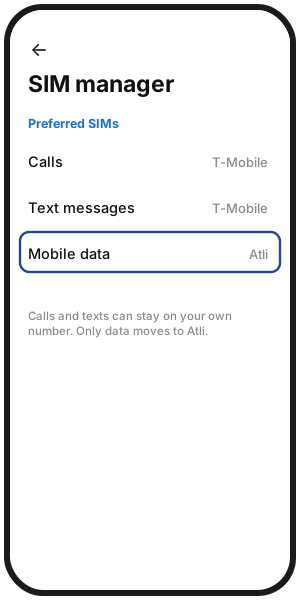
If your phone offers one primary SIM setting rather than separate ones for calls, texts and data, set Atli as primary while you are using it.
2. Turn data roaming on for Atli
Settings › Connections › Mobile networks › Data roaming on.
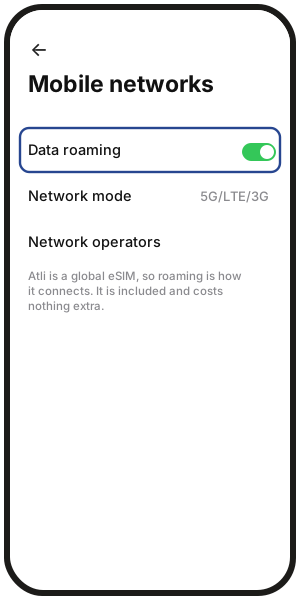
Atli is a global eSIM, so roaming is how it connects. It is included and costs nothing extra. If your phone sets roaming for each SIM separately, as Pixel does, turn it on for the Atli eSIM only.
3. Decide what your regular SIM does
Atli carries data only. If calls and texts stay on your normal number, your operator can still charge you for calls you make and texts you send abroad. Receiving texts costs nothing.
To avoid that, turn data roaming off on your regular SIM, or switch that SIM off for the trip.
4When you arrive
Your plan has not started yet. It starts when your phone first connects to a network at your destination. Not when you buy it, and not when you install it. Nothing connecting at home is normal.
- When you arrive, turn airplane mode off.
- Wait two or three minutes. Joining a foreign network is not instant.
- No Service for those first few minutes is normal. Do not delete the eSIM.
If it is still not connected after a few minutes, turn airplane mode on for ten seconds and off again.
5Check it worked
- Your status bar shows signal next to the Atli line.
- Turn wifi off and open any web page. If it loads, you are on Atli.
- Type check data in the Atli chat to see your data usage and validity.
6What uses your data
Most of it goes on things you did not ask for: cloud photo backups, app updates, feeds refreshing.
- App updates. Set the App Store or Play Store to update on wifi only.
- Photo backup. Set it to back up on wifi only.
- Streaming. Drop the quality a notch. High quality video uses about 1 GB in 20 minutes.
- Hotspot. A laptop uses far more than a phone. Watch the meter while you share.
- Data Saver. Settings › Connections, or Network & internet.